• contacto@bajaopensolutions.com
  • +52 (664) 181 4889

Opnsense Reportes de Navegacion del Web Proxy Parte 3

Opnsense Reportes de Navegacion del Web Proxy Parte 3

Introduccion

Con este contenido damos por terminado la saga de OpnSense+Web Proxy Transparente+Plugin OpnProxy, si han implementado Squid en OpnSense siguiendo los 2 videos anteriores, entonces ya tiene muchos logs y solo nos falta la cereza del pastel, como obtener los reportes de navegación.

OpnSense no cuenta con una herramienta en sus Plugins para llevar a cabo esto, tenemos que hacer uso de las paqueterias de FreeBSD, el padre de OpnSense, pero debo aclarar que el equipo de OpnSense no se hara responsable si algo no funciona, porque estamos usando software de 3ros.

Entonces cuando llevemos a cabo las actualizaciones de OpnSense no se les olvide revisar que esta aplicacion siga funcionando.

SARG Squid Analysis Report Generator

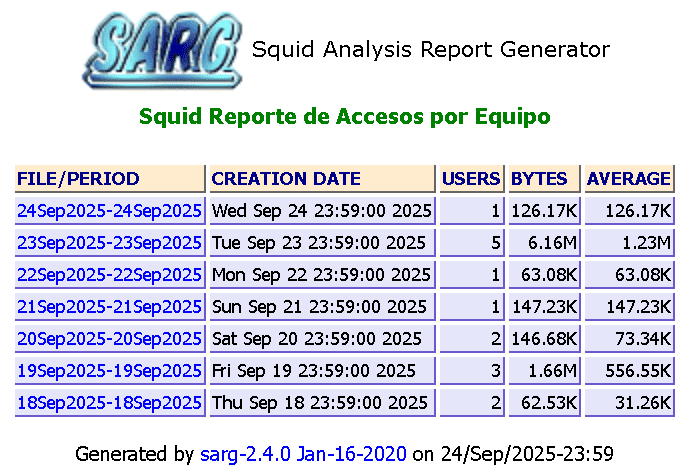
Sarg es la herramienta encargada de obtener los reportes como los que muestro en la siguiente imagen:

Puede observar que por cada dia se cuenta con un reporte y si seleccionamos cualquiera de las fechas, obtenemos algo similar a lo anterior, los usuarios que nevagaron.

Detalles de Sarg

No se desesperen, ya llegaremos a esto.

Existen otras herramientas como LightSquid la cual utiliza Pfsense, pero en lo personal, SARG siempre me ha parecido superior, pero como siempre he dicho, el gusto se rompe en generos.

Como lo comente anteriormente, tienen que tener trabajando a Squid en OpnSense para que genere logs, que nos registre cada uno de los destinos web que nuestros usuarios acceden y con esto Sarg se encargara del resto.

Posiblemente se preguntaran, ¿De donde obtiene SARG esos reportes?, muy sencillo, de el log de Squid:

access.log

Que se localiza en:

/var/log/squid

No se les olvide esto cuando editen el archivo de configuracion de SARG.

Video #1

Todo inicia desde el 1er video donde hablamos sobre squid y como configurarlo, asi que si aun no lo han llevado a cabo, aqui se los dejo, si ya lo tienen trabajando, saltense hasta el tema de configuracion de SARG.

Una vez puesto en marcha, empieza el log de squid a registrar los destinos de los usuarios, que es de donde sarg obtiene los reportes.

Video #2

Y una vez terminado y puesto en marcha el video anterior, continuan con este 2do video, donde llevamos a cabo los famosos ACL o controles de acceso a Internet con los que cuenta Squid, esto se lleva usando su plugin llamado OpnProxy, es el video mas largo de la saga pero el que realmente nos permite controlar a cada uno de nuestros usuarios, aqui se los dejo.

Ahora, una vez finalizado este 2do video, ademas de los sitios permitidos, tambien empezara squid a registrar los sitios no permitidos, y con esto ceramos el circulo, todo esto lo vamos a poder observar cuando sarg obtenga los reportes.

Instalacion de SARG

Para instalar sarg requerimos acceso a la consola, o sea atraves de ssh a OpnSense y solo ejecutamos este comando

root@fwproxy:/var/log/squid # pkg install sarg

Y solo esperamos descargue todo lo necesario y lo mas importante, que no marque error. Les recuerdo, este paquete no viene en la paqueteria oficial de OpnSense, aqui estamos usando los paquetes de su OS padre FreeBSD.

Configuración de SARG

Por utilizar FreeBSD como su OS padre, OpnSense sigue sus lineamientos, por lo tanto la configuracion de SARG se localiza en esta ruta:

/usr/local/etc/sarg

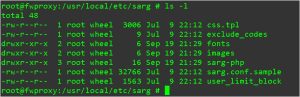
Y dentro de su directorio se encuentran varios archivos, aqui se los muestro:

Archivos de Sarg
Archivos de Sarg

El archivo de configuracion de sarg debe llamarse sarg.conf, por lo tanto vamos a generarlo atraves de la plantilla base, la que tiene nombre de sarg.conf.sample. De una manera muy simple:

Primero nos movemos a la ubicacion de la configuracion:

cd /usr/local/etc/sarg

y creamos una copia de la plantilla base, asi:

cp sarg.conf.sample sarg.conf

Listo, ahora si pasamos a configurar sarg.

sarg.conf

Les recuerdo que el editor base de OpnSense es ‘ee‘, es mas sencillo que vi, y no trae nano de fabrica. Asi que abrimos nuestro archivo y lo vamos a dejar de la siguiente manera:

NOTA: Es muy extensa la configuracion de sarg, no se asusten.

# sarg.conf
#
# TAG:  access_log file
#       Where is the access.log file
#
#       This option can be repeated multiple times to list rotated files or
#       files from different sources.
#
#       The files named here must exists or sarg aborts. It is intended as a
#       safety against incomplete reporting due to problems occuring with the
#       logs.
#
#       If the file globbing was compiled in, the file name can contain shell
#       wildcards such as * and ?. Tilde expension and variable expension are
#       not supported. Special characters can be escaped with a backslash.
#
#       If some files are passed on the command line with “sarg -l file” or
#       “sarg file”, the files listed here are ignored.
#
access_log /var/log/squid/access.log
 
# TAG: graphs yes|no
# Use graphics where is possible.
#           graph_days_bytes_bar_color blue|green|yellow|orange|brown|red
#
graphs yes
graph_days_bytes_bar_color orange
 
# TAG:  graph_font
#       The full path to the TTF font file to use to create the graphs. It is required
#       if graphs is set to yes.
#
graph_font /usr/local/etc/sarg/fonts/DejaVuSans.ttf
 
# TAG: title
# Especify the title for html page.
#
title “Squid Reportes de Acceso”
 
# TAG: font_face
# Especify the font for html page.
#
font_face Tahoma,Verdana,Arial
 
# TAG: header_color
# Especify the header color
#
header_color darkblue
 
# TAG: header_bgcolor
# Especify the header bgcolor
#
header_bgcolor blanchedalmond
 
# TAG: font_size
# Especify the text font size
#
font_size 9px
 
# TAG: header_font_size
# Especify the header font size
#
header_font_size 9px
 
# TAG: title_font_size
# Especify the title font size
#
title_font_size 11px
 
# TAG: background_color
# Html page background color
#
 background_color white
 
# TAG: text_color
# Html page text color
#
text_color #000000
 
# TAG: text_bgcolor
# Html page text background color
#
text_bgcolor lavender
 
# TAG: title_color
# Html page title color
#
title_color green
 
# TAG: logo_image
# Html page logo.
#
#logo_image none
 
# TAG: logo_text
# Html page logo text.
#
#logo_text “”
 
# TAG: logo_text_color
# Html page logo texti color.
#
#logo_text_color #000000
 
# TAG: logo_image_size
# Html page logo image size.
#       width height
#
#image_size 80 45
 
# TAG: background_image
# Html page background image
#
#background_image none
 
# TAG:  password
#       User password file used by Squid authentication scheme
#       If used, generate reports just for that users.
#
#password none
 
# TAG:  temporary_dir
#       Temporary directory name for work files
#       sarg -w dir
#
temporary_dir /tmp
 
# TAG:  temporary_dir_path
#       Path to append after the temporary_dir.
#       For historical reasons it used to be /sarg before v2.4. The full temporary
#       dir was, therefore, always the predicatble path /tmp/sarg. As it was considered
#       unsafe to use a predictable name in the world writable /tmp directory, the path
#       now used is a random unique name.
#       When this parameter is left empty, sarg uses a unique temporary path such as
#       sargXXXXXX where XXXXXX is replaced with a string to make the temporary dir unique
#       on the system.
#       The main drawback is that any temporary directory left over by a previous run of sarg
#       pollutes /tmp and may fill the disk up if sarg tends to crash often.
#       If you want to use a known fixed temporary path as it used to be prior to v2.4, you are
#       advised to set temporary_dir to /var/lib and set temporary_dir_path to /sarg. Sarg must
#       run as a user with the right to write to /var/lib/sarg.
#
#temporary_dir_path /sarg
 
# TAG:  output_dir
#       The reports will be saved in that directory
#       sarg -o dir
#
output_dir /usr/local/www/squid-reports
 
# TAG:  anonymous_output_files yes/no
#       Use anonymous file and directory names in the report. If it is set to
#       no (the default), the user id/ip/name is slightly mangled to create a
#       suitable file name to store the report of the user but the user’s
#       identity can easily be guessed from the mangled name. If this option is
#       set, any file or directory belonging to the user is replaced by a short
#       number.  The purpose is to hide the identity of the user when looking
#       at the report file names but it may serve to shorten the path too.
#
#anonymous_output_files no
 
# TAG:  output_email
#       Email address to send the reports. If you use this tag, no html reports will be generated.
#       sarg -e email
#
#output_email none
 
# TAG:  resolve_ip modulelist
#       List the modules to use to convert IP addresses into names.
#       Each named module is tried in sequence until one returns a result. Therefore
#       the order of the modules is relevant.
#       The modules must be listed on one line each separated from the previous one with
#       a space.
#
#       The possible modules are
#         dns Use the DNS.
#         exec Call an external program with the IP address as argument.
#
#       For compatibility with previous versions, yes is a synonymous for dns and
#       no does nothing.
#       sarg -n forces the use of the dns module.
resolve_ip no
 
# TAG:  resolve_ip_exec command
#       If resolve_ip selects the exec module, this is the command to run to
#       resolve an IP address. The command must contain a placeholder where the
#       IP address is inserted. The placeholder must be %IP in uppercases. The
#       placeholder may be repeated multiple times if necessary.
#
#       The command is expected to return the host name without frills on its
#       standard output. If the command returns nothing, it is assumed that the
#       command could not resolve the IP address and the next module in the
#       chain is given a try with the same address.
#
#       This option can only be used once. Therefore there is only one command
#       available to resolve an IP address but the program can do anything it
#       deems fit including attempting several strategies.
#
#       Beware that running an external program is exceedingly slow. So you
#       should try the DNS first and only call an external program if the DNS
#       fails.
#resolve_ip_exec nmblookup -A %IP | sed -n -e ‘s/^ *\(.*\) *<00> – *B.*/\1/p’
 
# TAG:  user_ip yes/no
#       Use Ip Address instead userid in reports.
#       sarg -p
user_ip yes
 
# TAG:  topuser_sort_field field normal/reverse
#       Sort field for the Topuser Report.
#       Allowed fields: USER CONNECT BYTES TIME
#
topuser_sort_field BYTES reverse
 
# TAG:  user_sort_field field normal/reverse
#       Sort field for the User Report.
#       Allowed fields: SITE CONNECT BYTES TIME
#
user_sort_field BYTES reverse
 
# TAG:  exclude_users file
#       Users within the file will be excluded from reports.
#       Write one user per line. Lines beginning with # are ignored.
#
#exclude_users none
 
# TAG:  exclude_hosts file
#       Hosts, domains or subnets will be excluded from reports.
#
#       Eg.: 192.168.10.10   – exclude ip address only
#            192.168.10.0/24 – exclude full C class
#            s1.acme.foo     – exclude hostname only
#            *.acme.foo      – exclude full domain name
#
#exclude_hosts none
 
# TAG:  useragent_log file
#       useragent.log file to generate useragent report.
#
#       This option may be repeated multiple times to process several files.
#
#       Wildcards are allowed (see access_log).
#
#       When this option is used the user_agent report is implicitly
#       selected in report_type.
#
#useragent_log none
 
# TAG:  date_format
#       Date format in reports: e (European=dd/mm/yy), u (American=mm/dd/yy), w (Weekly=yy.ww)
#
date_format e
 
# TAG:  per_user_limit file MB ip/id
#       Write the user’s ID (if last flag is ‘id’) or the user’s IP address (if last flag is ‘ip’)
#       in file if download exceed n MB.
#       This option allows you to disable user access if users exceed a download limit.
#       The option may be repeated up to 16 times to generate several files with
#       different content type or limit.
#
#       Examples:
#       per_user_limit userlimit_1G.txt 1000 ip
#       per_user_limit /var/log/sarg/userlimit_500M.log 500 id
#
#per_user_limit none
 
# TAG:  per_user_limit_file_create always/as_required
#       When to create a per_user_limit file.
#
#       Use ‘always’ to always create the file requested by per_user_limit
#       even if it is empty.
#
#       Use ‘as_required’ to create a per_user_limit file only if at least
#       one user crosses the limit.
#
#per_user_limit_file_create always
 
# TAG: lastlog n
#      How many reports files must be keept in reports directory.
#      The oldest report file will be automatically removed.
#      0 – no limit.
#
lastlog 30
 
# TAG: remove_temp_files yes
#      Remove temporary files: geral, usuarios, top, periodo from root report directory.
#
remove_temp_files yes
 
# TAG: index yes|no|only
#      Generate the main index.html.
#      only – generate only the main index.html
#
index yes
 
# TAG: index_tree date|file
#      How to generate the index.
#
index_tree file
 
# TAG: index_fields
#      The columns to show in the index of the reports
#      Columns are: dirsize
#
index_fields dirsize
 
# TAG: overwrite_report yes|no
#      yes – if report date already exist then will be overwrited.
#       no – if report date already exist then will be renamed to filename.n, filename.n+1
#
overwrite_report no
 
# TAG: records_without_userid ignore|ip|everybody
#      What can I do with records without user id (no authentication) in access.log file ?
#
#      ignore – This record will be ignored.
#          ip – Use ip address instead. (default)
#   everybody – Use “everybody” instead.
#
records_without_userid ip
 
# TAG: use_comma no|yes
#      Use comma instead point in reports.
#      Eg.: use_comma yes => 23,450,110
#           use_comma no  => 23.450.110
#
use_comma yes
 
# TAG: mail_utility
#      Mail command to use to send reports via SMTP. Sarg calls it like this:
#         mail_utility -s “SARG report, date” “output_email” <“mail_content”
#
#      Therefore, it is possible to add more arguments to the command by specifying them
#      here.
#
#      If you need too, you can use a shell script to process the content of /dev/stdin
#      (/dev/stdin is the mail_content passed by sarg to the script) and call whatever
#      command you like. It is not limited to mailing the report via SMTP.
#
#      Don’t forget to quote the command if necessary (i.e. if the path contains
#      characters that must be quoted).
#
#mail_utility mailx
 
# TAG: topsites_num n
#      How many sites in topsites report.
#
topsites_num 100
 
# TAG: topsites_sort_order CONNECT|BYTES|TIME|USER A|D
#      Sort for topsites report, where A=Ascendent, D=Descendent
#
topsites_sort_order CONNECT D
 
# TAG: index_sort_order A/D
#      Sort for index.html, where A=Ascendent, D=Descendent
#
index_sort_order D
 
# TAG: exclude_codes file
#      Ignore records with these codes. Eg.: NONE/400
#      Write one code per line. Lines starting with a # are ignored.
#      Only codes matching exactly one of the line is rejected. The
#      comparison is not case sensitive.
#
#exclude_codes /usr/local/sarg/etc/exclude_codes
 
# TAG: replace_index string
#      Replace “index.html” in the main index file with this string
#      If null “index.html” is used
#
#replace_index <?php echo str_replace(“.”, “_”, $REMOTE_ADDR); echo “.html”; ?>
 
# TAG: max_elapsed milliseconds
#      If elapsed time is recorded in log is greater than max_elapsed use 0 for elapsed time.
#      Use 0 for no checking
#
#max_elapsed 28800000
# 8 Hours
 
# TAG: report_type type
#      What kind of reports to generate.
#      topusers            – users, sites, times, bytes, connects, links to accessed sites, etc
#      topsites            – site, connect and bytes report
#      sites_users         – users and sites report
#      users_sites         – accessed sites by the user report
#      date_time           – bytes used per day and hour report
#      denied              – denied sites with full URL report
#      auth_failures       – autentication failures report
#      site_user_time_date – sites, dates, times and bytes report
#      downloads           – downloads per user report
#      user_agent          – user agent identification strings report (this report is always selected
#                            if at least one file is provided with useragent option)
#
#      Eg.: report_type topsites denied
#
report_type topusers topsites sites_users users_sites date_time denied auth_failures site_user_time_date downloads user_agent
 
# TAG: usertab filename
#      You can change the “userid” or the “ip address” to be a real user name on the reports.
#      If resolve_ip is active, the ip address is resolved before being looked up into this
#      file. That is, if you want to map the ip address, be sure to set resolv_ip to no or
#      the resolved name will be looked into the file instead of the ip address. Note that
#      it can be used to resolve any ip address known to the dns and then map the unresolved
#      ip addresses to a name found in the usertab file.
#      Table syntax:
# userid name   or   ip address name
#      Eg:
# SirIsaac Isaac Newton
# vinci Leonardo da Vinci
# 192.168.10.1 Karol Wojtyla
#
#      Each line must be terminated with ‘\n’
#      If usertab have value “ldap” (case ignoring), user names
#      will be taken from LDAP server. This method as approaches for reception
#      of usernames from Active Didectory
#
#usertab none
 
# TAG: LDAPHost hostname
# FQDN or IP address of host with LDAP service or AD DC
# default is ‘127.0.0.1’
#LDAPHost 127.0.0.1
 
# TAG: LDAPPort port
#       LDAP service port number
# default is ‘389’
#LDAPPort 389
 
# TAG: LDAPBindDN CN=username,OU=group,DC=mydomain,DC=com
# DN of LDAP user, who is authorized to read user’s names from LDAP base
# default is empty line
#LDAPBindDN cn=proxy,dc=mydomain,dc=local
 
# TAG: LDAPBindPW secret
# Password of DN, who is authorized to read user’s names from LDAP base
# default is empty line
#LDAPBindPW secret
 
# TAG: LDAPBaseSearch OU=users,DC=mydomain,DC=com
# LDAP search base
# default is empty line
#LDAPBaseSearch ou=users,dc=mydomain,dc=local
 
# TAG: LDAPFilterSearch (uid=%s)
# User search filter by user’s logins in LDAP
# First founded record will be used
# %s – will be changed to userlogins from access.log file
#       filter string can have up to 5 ‘%s’ tags
# default value is ‘(uid=%s)’
#LDAPFilterSearch (uid=%s)
 
# TAG: LDAPTargetAttr attributename
# Name of the attribute containing a name of the user
# default value is ‘cn’
#LDAPTargetAttr cn
 
# TAG: LDAPNativeCharset charset-iconv-style
# Character set to convert the LDAP string to.
# For the list of some available charsets use: “iconv -l”.
# This option requires libiconv and sarg must have been built with –with-iconv.
# default is empty line (UTF-8)
#LDAPNativeCharset ISO-8859-1
 
# TAG: long_url yes|no
#      If yes, the full url is showed in report.
#      If no, only the site will be showed
#
#      YES option generate very big sort files and reports.
#
long_url no
 
# TAG: date_time_by bytes|elap
#      Date/Time reports show the downloaded volume or the elapsed time or both.
#
date_time_by bytes
 
# TAG: charset name
#      ISO 8859 is a full series of 10 standardized multilingual single-byte coded (8bit)
#      graphic character sets for writing in alphabetic languages
#      You can use the following charsets:
# Latin1 – West European
# Latin2 – East European
# Latin3 – South European
# Latin4 – North European
# Cyrillic
# Arabic
# Greek
# Hebrew
# Latin5 – Turkish
# Latin6
# Windows-1251
# Japan
# Koi8-r
# UTF-8
#
#charset Latin1
 
# TAG: user_invalid_char “&/”
#      Records that contain invalid characters in userid will be ignored by Sarg.
#
#user_invalid_char “&/”
 
# TAG: privacy yes|no
#      privacy_string “***.***.***.***”
#      privacy_string_color blue
#      In some countries the sysadm cannot see the visited sites by a restrictive law.
#      Using privacy yes the visited url will be changes by privacy_string and the link
#      will be removed from reports.
#
#privacy no
#privacy_string “***.***.***.***”
#privacy_string_color blue
 
# TAG: include_users “user1:user2:…:usern”
#      Reports will be generated only for listed users.
#
#include_users none
 
# TAG: exclude_string “string1:string2:…:stringn”
#      Records from access.log file that contain one of listed strings will be ignored.
#
#exclude_string none
 
# TAG: show_successful_message yes|no
#      Shows “Successful report generated on dir” at end of process.
#
#show_successful_message yes
 
# TAG: show_read_statistics yes|no
#      Shows how many lines have been read from the current input log file.
#
show_read_statistics no
 
# TAG: show_read_percent yes|no
#      Shows how many percents have been read from the current input log file.
#
#      Beware that this feature requires to read the input log file once to
#      count the number of lines and then a second time to actually parse it.
#      You can save some time by disabling it.
#
#show_read_percent no
 
# TAG: topuser_fields
#      Which fields must be in Topuser report.
#
# Valid columns are
#    NUM           Report line number.
#    DATE_TIME     Icons to display the date and time reports.
#    USERID        Display the user’s ID. It may be a name or the IP address depending on other settings.
#    USERIP        Display the user’s IP address.
#    CONNECT       Number of connections made by the user.
#    BYTES         Number of bytes downloaded by the user.
#    %BYTES        Percent of the total downloaded volume.
#    IN-CACHE-OUT  Percent of cache hit and miss.
#    USED_TIME     How long it took to process the requests from that user.
#    MILISEC       The same in milliseconds
#    %TIME         Percent of the total processing time of the reported users.
#    TOTAL         Add a line to the report with the total of every column.
#    AVERAGE       Add a line to the report with the average of every column.
topuser_fields NUM DATE_TIME USERID CONNECT BYTES %BYTES IN-CACHE-OUT USED_TIME MILISEC %TIME TOTAL AVERAGE
 
# TAG: user_report_fields
#      Which fields must be in User report.
#
user_report_fields CONNECT BYTES %BYTES IN-CACHE-OUT USED_TIME MILISEC %TIME TOTAL AVERAGE
 
# TAG: bytes_in_sites_users_report yes|no
#      Bytes field must be in Site & Users Report ?
#
bytes_in_sites_users_report yes
 
# TAG: topuser_num n
#      How many users in topsites report. 0 = no limit
#
topuser_num 10
 
# TAG: datafile file
#      Save the report results in a file to populate some database
#
#datafile none
 
# TAG: datafile_delimiter “;”
#      ascii character to use as a field separator in datafile
#
#datafile_delimiter “;”
 
# TAG: datafile_fields all
#      Which data fields must be in datafile
#      user;date;time;url;connect;bytes;in_cache;out_cache;elapsed
#
#datafile_fields user;date;time;url;connect;bytes;in_cache;out_cache;elapsed
 
# TAG: datafile_url ip|name
#      Saves the URL as ip or name in datafile
#
#datafile_url ip
 
# TAG: weekdays
#      The weekdays to take into account ( Sunday->0, Saturday->6 )
# Example:
#weekdays 1-3,5
# Default:
#weekdays 0-6
 
# TAG: hours
#      The hours to take into account
# Example:
#hours 7-12,14,16,18-20
# Default:
#hours 0-23
 
# TAG: dansguardian_conf file
#      DansGuardian.conf file path
#      Generate reports from DansGuardian logs.
#      Use ‘none’ to disable it.
#      dansguardian_conf /usr/dansguardian/dansguardian.conf
#
#dansguardian_conf none
 
# TAG: dansguardian_filter_out_date on|off
#      This option replaces dansguardian_ignore_date whose name was not appropriate with respect to its action.
#      Note the change of parameter value compared with the old option.
#      ‘off’ use the record even if its date is outside of the range found in the input log file.
#      ‘on’  use the record only if its date is in the range found in the input log file.
#
#dansguardian_filter_out_date on
 
# TAG: squidguard_conf file
#      path to squidGuard.conf file
#      Generate reports from SquidGuard logs.
#      Use ‘none’ to disable.
#      You can use sarg -L filename to use an alternate squidGuard log.
#      squidguard_conf /usr/local/squidGuard/squidGuard.conf
#
#squidguard_conf none
 
# TAG: redirector_log file
#      the location of the web proxy redirector log such as one created by squidGuard or Rejik. The option
#      may be repeated up to 64 times to read multiple files.
#      If this option is specified, it takes precedence over squidguard_conf.
#      The command line option -L override this option.
#
#redirector_log /usr/local/squidGuard/var/logs/urls.log
 
# TAG: redirector_filter_out_date on|off
#      This option replaces squidguard_ignore_date and redirector_ignore_date whose names were not
#      appropriate with respect to their action.
#      Note the change of parameter value compared with the old options.
#      ‘off’ use the record even if its date is outside of the range found in the input log file.
#      ‘on’  use the record only if its date is in the range found in the input log file.
#
#redirector_filter_out_date on
 
# TAG: redirector_log_format
#      Format string for web proxy redirector logs.
#      This option was named squidguard_log_format before sarg 2.3.
#      REJIK       #year#-#mon#-#day# #hour# #list#:#tmp# #ip# #user# #tmp#/#tmp#/#url#/#end#
#      SQUIDGUARD  #year#-#mon#-#day# #hour# #tmp#/#list#/#tmp# #url# #ip#/#tmp# #user# #end#
#redirector_log_format #year#-#mon#-#day# #hour# #tmp#/#list#/#tmp# #url# #ip#/#tmp# #user# #end#
 
# TAG: show_sarg_info yes|no
#      shows sarg information and site path on each report bottom
#
show_sarg_info yes
 
# TAG: show_sarg_logo yes|no
#      shows sarg logo
#
show_sarg_logo yes
 
# TAG: parsed_output_log directory
#      Saves the processed log in a sarg format after parsing the squid log file.
#      This is a way to dump all of the data structures out, after parsing from
#      the logs (presumably this data will be much smaller than the log files themselves),
#      and pull them back in for later processing and merging with data from previous logs.
#
#parsed_output_log none
 
# TAG: parsed_output_log_compress /bin/gzip|/usr/bin/bzip2|nocompress
#      Command to run to compress sarg parsed output log. It may contain
#      options (such as -f to overwrite existing target file). The name of
#      the file to compresse is provided at the end of this
#      command line. Don’t forget to quote things appropriately.
#
#parsed_output_log_compress /bin/gzip
 
# TAG: displayed_values bytes|abbreviation
#      how the values will be displayed in reports.
#      eg. bytes  –  209.526
#          abbreviation –  210K
#
#displayed_values bytes
 
# Report limits
# TAG: authfail_report_limit n
# TAG: denied_report_limit n
# TAG: siteusers_report_limit n
# TAG: squidguard_report_limit n
# TAG: user_report_limit n
# TAG: dansguardian_report_limit n
# TAG: download_report_limit n
#      report limits (lines).
#      ‘0’ no limit
#
#authfail_report_limit 10
#denied_report_limit 10
#siteusers_report_limit 0
#squidguard_report_limit 10
#dansguardian_report_limit 10
#user_report_limit 0
#download_report_limit 50
 
# TAG: www_document_root dir
#     Where is your Web DocumentRoot
#     Sarg will create sarg-php directory with some PHP modules:
#     – sarg-squidguard-block.php – add urls from user reports to squidGuard DB
#
#www_document_root /var/www/html
 
# TAG: block_it module_url
#     This tag allow you to pass urls from user reports to a cgi or php module,
#     to be blocked by some Squid acl
#
#     Eg.: block_it /sarg-php/sarg-block-it.php
#     sarg-block-it is a php that will append a url to a flat file.
#     You must change /var/www/html/sarg-php/sarg-block-it to point to your file
#     in $filename variable, and chown to a httpd owner.
#
#     sarg will pass http://module_url?url=url
#
#block_it none
 
# TAG: external_css_file path
#     Provide the path to an external css file to link into the HTML reports instead of
#     the inline css written by sarg when this option is not set.
#
#     In versions prior to 2.3, this used to be an absolute file name to
#     a file to include verbatim in each HTML page but, as it takes a lot of
#     space, version 2.3 switched to a link to an external css file.
#     Therefore, this option must contain the HTTP server path on which a client
#     browser may find the css file.
#
#     Sarg use theses style classes:
# .logo logo class
# .info sarg information class, align=center
# .title_c title class, align=center
# .header_c header class, align:center
# .header_l header class, align:left
# .header_r header class, align:right
# .text text class, align:right
# .data table text class, align:right
# .data2 table text class, align:left
# .data3 table text class, align:center
# .link  link class
#
#     Sarg can be instructed to output the internal css it inline
#     into the reports with this command:
#
#        sarg –css
#
#     You can redirect the output to a file of your choice and edit
#     it to your liking.
#
#external_css_file none
 
# TAG: user_authentication yes|no
#     Allow user authentication in User Reports using .htaccess
#     Parameters:
# AuthUserTemplateFile – The template to use to create the
#     .htaccess file. In the template, %u is replaced by the
#     user’s ID for which the report is generated. The path of the
#     template is relative to the directory containing sarg
#     configuration file.
#
# user_authentication no
# AuthUserTemplateFile sarg_htaccess
 
# TAG: download_suffix “suffix,suffix,…,suffix”
#    file suffix to be considered as “download” in Download report.
#    Use ‘none’ to disable.
#
#download_suffix “zip,arj,bzip,gz,ace,doc,iso,adt,bin,cab,com,dot,drv$,lha,lzh,mdb,mso,ppt,rtf,src,shs,sys,exe,dll,mp3,avi,mpg,mpeg”
 
# TAG: ulimit n
#    The maximum number of open file descriptors to avoid “Too many open files” error message.
#    You need to run sarg as root to use ulimit tag.
#    If you run sarg with a low privilege user, set to ‘none’ to disable ulimit
#
#ulimit 20000
 
# TAG: ntlm_user_format user|domainname+username
#      NTLM users format.
#
#ntlm_user_format domainname+username
 
# TAG: strip_user_suffix suffix
#      Remove a suffix from the user name. The suffix may be
#      a Kerberos domain name. It must be at the end of the
#      user name (as is implied by a suffix).
#
#      This is a lightweight easy to configure option. For a
#      more complete solution, see useralias.
#strip_user_suffix @example.com
 
# TAG: realtime_refresh_time num sec
#      How many time to auto refresh the realtime report
#      0 = disable
#
# realtime_refresh_time 3
 
# TAG: realtime_access_log_lines num
#      How many last lines to get from access.log file
#
# realtime_access_log_lines 1000
 
# TAG: realtime_types: GET,PUT,CONNECT,ICP_QUERY,POST
#      Which records must be in realtime report.
#
# realtime_types GET,PUT,CONNECT,POST
 
# TAG: realtime_unauthenticated_records: ignore|show
#      What to do with unauthenticated records in realtime report.
#
# realtime_unauthenticated_records: show
 
# TAG: byte_cost value no_cost_limit
#      Cost per byte.
#      Eg. byte_cost 0.01 100000000
#           per byte cost      = 0.01
#           bytes with no cost = 100 Mb
#      0 = disable
#
# byte_cost 0.01 50000000
 
# TAG: squid24 on|off
#      Compatilibity with squid version <= 2.4 when using emulate_http_log on
#
# squid24 off
 
# TAG: sorttable path
#      The path to a javascript script to dynamically sort the tables.
#      The path is the link a browser must follow to find the script. For instance,
#      it may be http://www.myproxy.org/sorttable.js or just /sorttable.js if the script
#      is at the root of your web site.
#
#      If the path starts with “../” then it is assumed to be a relative
#      path and sarg adds as many “../” as necessary to locate the js script from
#      the output directory. Therefore, ../../sorttable.js links to the javascript
#      one level above output_dir.
#
#      If this entry is set, each sortable table will have the “sortable” class set.
#      You may have a look at http://www.kryogenix.org/code/browser/sorttable/
#      for the implementation on which sarg is based.
#
# sorttable /sorttable.js
 
# TAG: hostalias
#      The name of a text file containing the host names one per line and the
#      optional alias to use in the report instead of that host name. If the
#      alias is missing, the host name is replaced by the matching pattern
#      (that is, including the wildcard). For instance, in the example below,
#      any host matching *.gstatic.com is grouped, in the report, under the
#      text “*.gstatic.com”.
#
#      Host names may contain up to one wildcard denoted by a *. The wildcard
#      must not end the host name.
#
#      The host name may be followed by an optional alias but if no alias is
#      provided, the host name, including the wildcard, replaces any matching
#      host name found in the log.
#
#      Host names replaced by identical aliases are grouped together in the
#      reports.
#
#      IP addresses are supported and accept the CIDR notation both for IPv4 and
#      IPv6 addresses.
#
#      Regular expressions can also be used if sarg was compiled with libpcre.
#      A regular expression is formated as re:/regexp/ alias
#      The regexp is a perl regular expression (see man perlre).
#      Subpatterns are allowed in the alias. Sarg recognizes sed (\1) or perl ($1)
#      subpatterns. Only 9 subpatterns are allowed in the replacement string.
#      Regex are case sensitive by default. To have a case insensitive regex,
#      defined it like this: re:/regexp/i alias
#      The option “i” must be written with a lower case.
#
#      Example:
#      *.gstatic.com
#      mt*.google.com
#      *.myphone.microsoft.com
#      *.myphone.microsoft.com:443 *.myphone.microsoft.com:secure
#      *.freeav.net antivirus:freeav
#      *.mail.live.com
#      65.52.00.00/14 *.mail.live.com
#      re:/\.dropbox\.com(:443)?/ dropbox
#      re:/([\w-]+)\.(\w*[a-zA-Z]\w*)(?::\d+)?$/ \1.\2
#hostalias /usr/local/sarg/hostalias
 
# TAG: useralias
#      The name of a text file containing the user names one per line and the
#      optional alias to use in the report instead of that user name.
#      See the description of hostalias. It uses the same file format as the
#      useralias option.
#
#      Example:
#      user454 John
#      admin* Administrator
#      re:/^(.*)@example.com$/i \1
#useralias /usr/local/sarg/useralias
 
# TAG: keep_temp_log yes|no
#      Keep temporary files created by sarg to produce its reports. The normal
#      operation mode is to delete those files when they are not necessary any more.
#
#      Never leave that option to “yes” for normal operation as temporary files
#      left over by previous run can be included in subsequent reports.
#
#      Use this option only to diagnose a problem with your reports. A better
#      alternative is to run sarg from the command line with optino -k.
#keep_temp_log no
 
# TAG: max_successive_log_errors n
#      Set the number of consecutive errors allowed in the input log file before
#      the reading is aborted with an error.
#max_successive_log_errors 3
 
# TAG: max_total_log_errors n
#      The reading of the input log file is interrupted if too many errors are found
#      in the log file. This parameter set the number of errors before the reading
#      is aborted. Set it to -1 to keep reading the logs irrespective of the
#      errors found.
#
#      Note that the max_successive_log_errors is still taken into account and
#      cannot be disabled.
#max_total_log_errors 50
 
# TAG: include conffile
#      Include the specified conffile. The full path must be provided to
#      make sure the correct file is loaded.
#
#      Use this option to store common options in one file and include it
#      in multiple sarg.conf dedicated to various reporting tasks.
#
#      Options declared last take precedence. Use it to include a file and
#      then override some options after the include statement. Beware that
#      some options are cumulative such as access_log, useragent_log or
#      redirector_log. You can’t override those options as explained here.
#      Declaring them in the common file and the including file will merely
#      add the latter to the list.
#include /etc/sarg/sarg-common.conf
 
Les estoy mostrando todo el archivo, puede copearlo y pegarlo, honestamente no creo les falle. De igual manera les comparto el link para su descarga:
 

Creacion del Directorio de Reportes

Si revisan el archivo, hay un parametro que dice asi:
 
output_dir /usr/local/www/squid-reports
 
Ese directorio es donde sarg almacenara todos los reportes dia con dia, como no existe lo tenemos que crear. Asi que nos regresamos a la consola y ejecutamos el siguiente comando:
 
mkdir /usr/local/www/squid-reports
 
Listo.

Prueba Manual de Sarg

Vamos hacer nuestro check-list:

1)Sarg ya esta instalado

2)Archivo de configuracion listo(sarg.conf)

3)Directorio de almacenamiento de reportes creado.

4)Ya tenemos registros en el log de squid, access.log

Entonces ejecutamos desde la consola, asi:

/usr/local/bin/sarg

Dependiendo el tamaño del archivo puede durar unos minutos o bien, al instante, es muy eficiente sarg. Ahora para validarlo, en nuestro navegador apunten a el ip o hostname de OpnSense a el directorio de los reportes de squid:

https://ip-opnsense/squid-reports
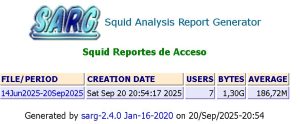
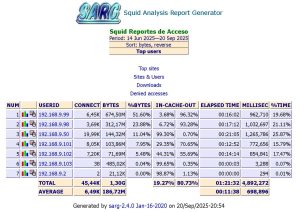
Squid Reports
Squid Reports

Observen que en mi caso se ha consumido 1.3GB de datos de navegacion. Ahora, vemos los detalles, le damos un click  a la fecha y veremos algo similar a la siguiente imagen:

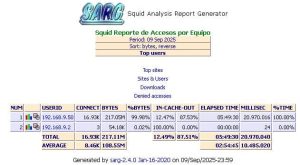
Detalles del Reporte

Sin miedo en la parte alta tenemos varios reportes, a la izquierda los clientes que navegaron atraves de este proxy, pongan atencion y observaran la columna ‘bytes‘, esa nos indica cuanto consumo este usuario de datos de navegacion, informacion muy valiosa.

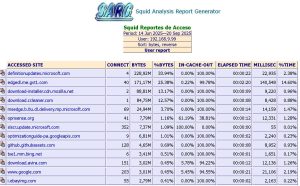
Ahora le dare un click a uno de mis usuarios para ver los destinos que accedio y cuantos datos consumio en cada destino, de igual manera ponganle atencion a los sitios bloqueados ‘DENIED’.

Reporte de Usuario

Ustedes mismos revisen el resto de los reportes y analicen la informacion mostrada.

Agregar Sarg a Cron

Ya validamos que sarg esta funcionando, ahora lo que sigue es que atraves de cron se ejecute para que todos los dias antes de la media noche obtenga el reporte del dia, ya que a la  media noche, squid rota su log(access.log). No podemos usar los mecanismos clasicos de Unix(OpnSense es un Unix) para hacer esto, ocupamos usar los mecanismos de OpnSense.

Para esto, vamos a crear un arhivo de nombre ‘actions_sarg.conf” en esta ruta:

/usr/local/opnsense/service/conf/actions.d

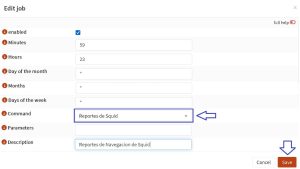
A el archivo le agregamos este contenido:

[restart]
command:/usr/local/bin/sarg
parameters:
type:script
message:
description:Reportes de Squid

Salvamos y salimos.

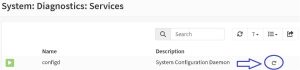
Lo que sigue es reiniciar el servicio: configd, para estos nos vamos a System->Diagnostics->Services

Buscamos el servicio configd y lo reiniciamos.

Reiniciar configd


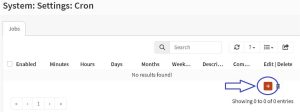
Ahora nos regresamos a el GUI de OpnSense, a el menu: System->Settings->Cron.

Presionamos el icono de + que se localiza a la derecha, ver siguiente imagen:

Agregamos Nueva Tarea

Y configuramos a sarg para que se ejecute todos los dias a las 23:59, antes que squid rote su archivo, ver siguiente imagen.

Agregar Reporte de Sarg

Si todo funciona, tendremos ya 2 reportes con la misma fecha, ya que recuerden, lo ejecutamos de manera manual, si desean borar los reportes creados hasta hoy, borren el contenido del directorio de reportes y listo.

cd /usr/local/www/squid-reports

rm -rf ./*

De igual manera, les recomiendo limpiar el cache de sus navegador, por que les puede mentir y aunque hayan borrado el contenido del directorio, les puede mostrar el reporte de su cache.

Ya solo esperar se ejecuten via cron, si no funciona, les recomiendo regresar al inicio y empezar de nuevo.

Resumen

Ahora si podemos dar por terminada la saga de OpnSense y su Web Proxy en Modo Transparente con su Plugin OpnProxy para los controles de acceso(ACL) de squid. Hay mucho discusion sobre si hoy en dia, aun es conveniente implementar squid para controlar el acceso a Internet. Cuando llegan a OpnSense, una de las preguntas basicas es, ¿Como puedo ver a que paginas mis usuarios nevegan?, de fabrica OpnSense es un firewall, el solo esta filtrando paquetes a nivel IP+puerto.

Aunque el tiene manera de saber a que destinos los usuarios acceden, no es una tarea de un firewall como tal, su funcion es permitir o no el destino+puerto del cliente, un firewall no lidia con, es facebook.com este no, es playboy.com este tampoco, es yahoo.com.mx este si. Y pueden decirme, oyes pero si agrego un alias y ahi coloco los destinos anteriores que no deseo mis usuario accesen, entonces si sabe sobre ellos.

Si, pero el no tiene un reporte para entregarles que destino bloqueo, y no hay un reporte como tal de fabrica.

Por ello, la unica manera de respoder la pregunta es, implementando un web proxy, aun que a veces es tedioso lo se, pero es la unica manera de obtener esos datos.

Notaran que sarg nos ofrece informacion muy valiosa, como cuanto consume cada usuario dia con dia, a que destinos van, a que horas, otro dato muy interesante, a que destinos prohibidos intentan acceder, en mi tiempo como sys admin, ya hemos dado de baja empleados de rango gerentes de departamento gracias a squid+sarg.

Ahora, por el otro lado, muchos sys admins prefieren no lidiar con un web proxy y prefieren usar herramientas en los equipos de los usuario finales, ya sea con el mismo AV, es tambien valido, no existe un unico camino en como controlar el acceso a Internet.

Lo mas importante es la valiosa informacion que nos brinda sarg para toma de decisiones y poner en cinta a los usuarios, es mas importante que el departamento de nomina pueda llevar a cabo el pago de los empleados, que compras pueda comprar la materia prima o que ventas amarre un nuevo pedido, que un empleado este agusto viendo un capitulo de su programa favorito, como les he preguntado varias veces, ¿que prefieren, que llores en tu casa o que lloren en la casa del otro?

Subscribete para seguir aprendiendo…

Nos vemos pronto.

Buscar

Categoría

Información de contacto

Posts Relacionados

Pfsense 2.8.1 Release Disponible

    Por fin llego la version de la actualizacion de rama PfsenseCE 2.8.0, 2.8.1CE ya disponible. Analizando las notas, realmente es…
      Deja un comentario

      Tu dirección de correo electrónico no será publicada. Los campos obligatorios están marcados con *

      ¿Listo para llevar tu red al siguiente nivel?

      ¡Contáctanos hoy mismo y une tu red al futuro de la seguridad!
      • Solicita tu asesoría gratuita
      • Cotiza tu equipo
      • Recibe soporte experto
      “Tu red, tu seguridad, tu futuro.” | Brindando Soporte de firewalls PfSense y OpnSense de México hasta España
      • contacto@bajaopensolutions.com
      • +52 (664) 181 4889

      Redes Sociales

      Baja Open Solutions © 2025 Todos los derechos reservados.

      Contáctanos

      Uno de nuestros expertos te atenderá.